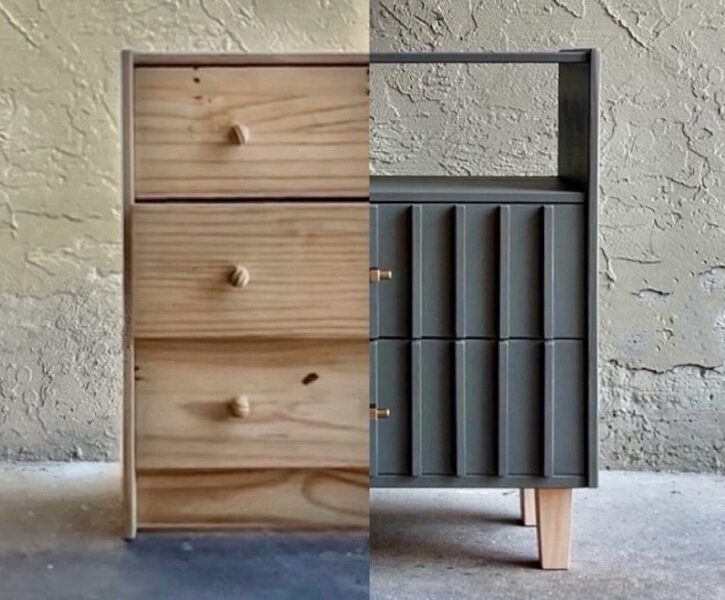
This is my 2nd IKEA hack tutorial for the Malm Dresser. In the 1st one, I added a Boho-inspired rattan design to the drawers, and in this one, I’ll show you how to add a fluted design instead! Both the designs complements various interior styles – from contemporary to minimalist, and even Wabi-Sabi and Japandi.


Design Concept
The IKEA Malm dresser design itself, is a little plain, so I used store-bought pole-wrap to give it a fluted design, added wooden legs to give it a more modern, less bulky look, painted it black and added gold handles.
Tools and Supplies Used
Below is a list of tools and supplies used.
Affiliate disclosure: when a purchase is made through the links below, I may earn a small commission from qualifying purchases on Amazon and other retailers.
- Pole-Wrap (make sure to check you purchase the right dimensions): link.
- Drill & Driver: link.
- Circular Saw: link.
- Sander: link.
- Nail Gun: link.
- Wood Filler: link.
- Wood Glue: link.
- Wooden legs (4.5″): link.
- Drawer handles: link.
- Wooden legs: link.
- Behr Metallic Gold Paint: link.
- Shellac-Base Primer: link.
- Dense Foam Roller: link.
Step-by Step Guide
Add Fluting and Drawer Handles


- Cut the pole-wrap down to match the drawer size. Pole-wrap is a fluted panel that can be found at Home Depot, Lowe’s and other local hardware stores.
- Apply a generous amount of wood glue to the back of the pole-wrap and attach it to the drawer face using a nail gun. Take note that when nailing it down, nail from one direction to the other, and pull the pole wrap tightly to ensure the pole wrap is well attached to the drawer. If it isn’t well attached, the wood of the pole-wrap may expand/contract during weather changes and cause it to lift or bubble up.
- Once completed, use wood filler and fill in the nail holes. After nailing the pole-wrap to each drawer, use clamps to hold it down as the glue dries.
- The handles I had from previous projects was black, so I spray painted it gold (if yours is old, skip this step).
- Attach the handles. Note that as there is a slope to the top edge of the Malm drawer, not all handles fits well, so I recommend using the one I linked above.
Attaching the Legs
- Since the base of the Malm dresser is hollow, a base support needs to be created before legs can be attached. See video on how to create a base structure.
- Once the base support is added, attach the legs. If you’re using the same legs I used, measure and mark where you want the legs. Next, drill a hole 1/2” in diameter and about 1” deep in the base structure, screw in the metal plate, and lastly screw in the wooden leg.
If you like the look of the natural wood tones, you can finish the dresser here, but if you prefer to give it a pop of color, you can proceed with the following steps to paint it.

Painting the Dresser
- Before painting, use a shellac-based primer (not water-based) to prime the area you wish to paint. Note: do not skip this step! Shellac-based primer is needed as it adhere’s better to IKEA veneer furniture and increases the durability of the paint. For an even application, use a dense foam roller instead of a paint brush.
- Once the primer dries, sand over with a 400 grit sandpaper to smooth out the surface.
- Brush away any dust and paint the dresser into your desired color. I used Behr’s Black paint. Like before, use a dense foam roller to get an even paint application. Paint 2-3 layers and allow the paint to fully dry in between coats.
- For the legs, if you wish to paint it black and gold (like my design), first spray paint the bottom section of the legs and allow it to dry, then use painter’s tape to tape off and cover the gold area, and paint the top section black.
And here is the completed dresser! I love it!

Video Tutorials
If you have any questions, leave a comment below, in the YouTube video, or DM me on Instagram. I will help answer as best as I can!


Leave a Reply
You must be logged in to post a comment.