• Skip to primary navigation
  • Skip to main content
  • Skip to primary sidebar
  • Skip to footer
JnnLiuLiu Text Logo

JnnLiuLiu

Inspiring Home, Decor, DIY Tutorials

  • Home
  • DIY Tutorials
    • IKEA Hack
      • IKEA Hack – How to add Rattan to Malm Dresser
      • IKEA Hack – How to add Fluting to Malm Dresser
      • IKEA Hack – Complete Rast Dresser Makeover
    • How to Build a Fluted Coffee Table
    • How to Paint Tiles and What Tile Paint to Use
    • How to Build a Built-in Bookshelf
  • About

How to Build a Fluted Coffee Table

Aug. 18, 2023

In this DIY tutorial, I will show you how to make wooden, fluted coffee tables with just a simple few power tools.

Design Concept

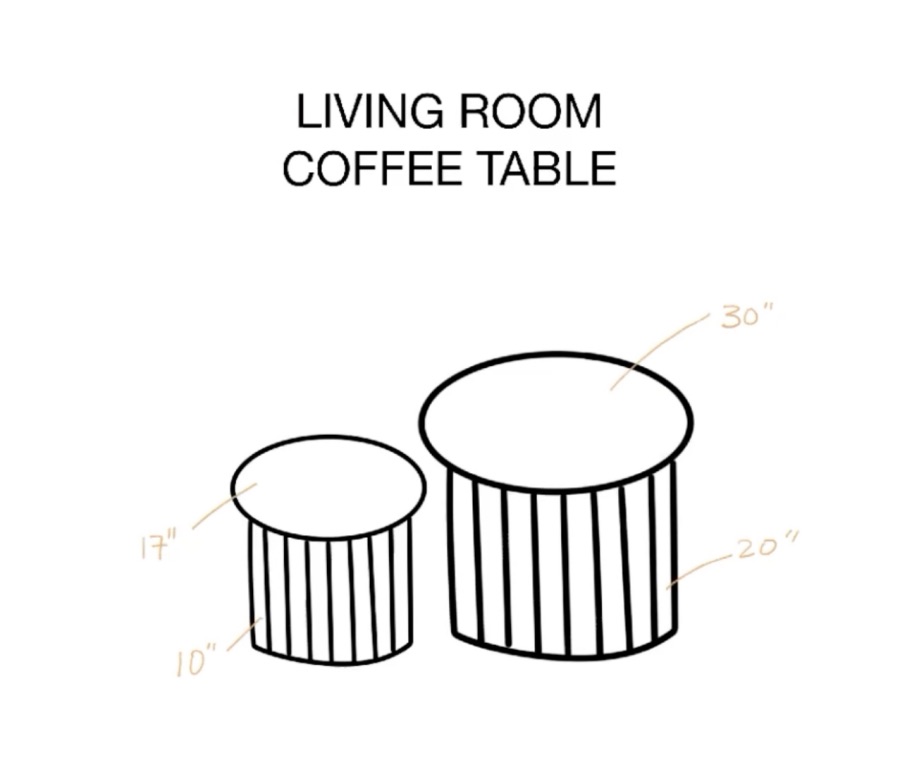
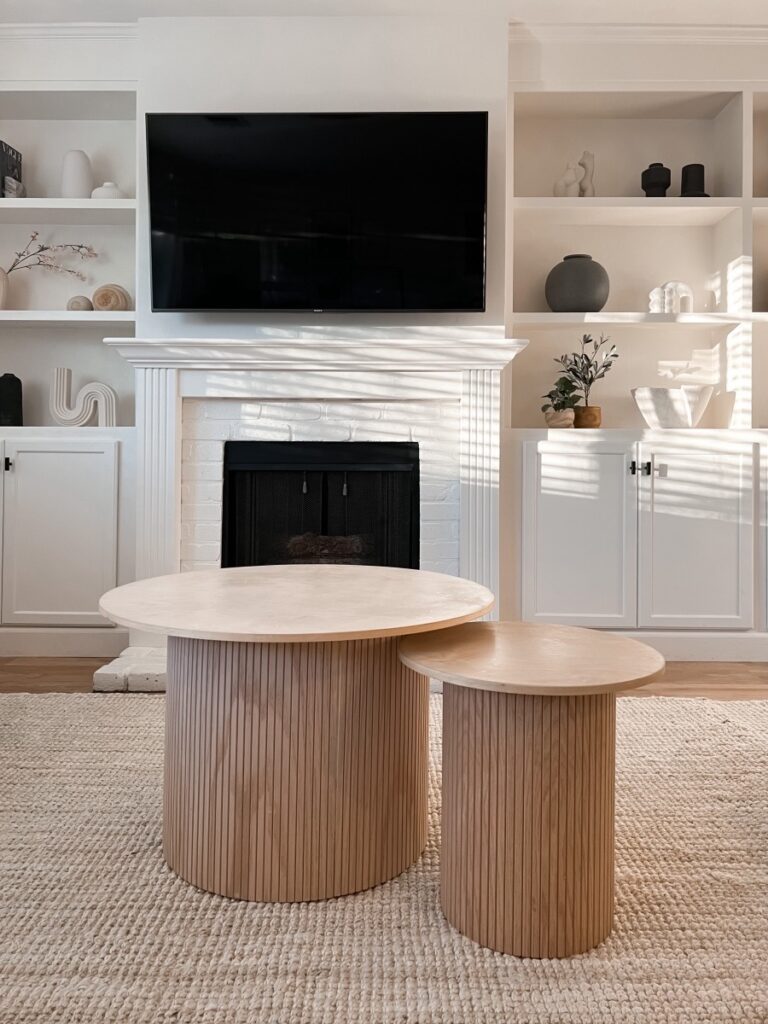
The coffee tables are circular in shape with a tabletop resting on a pole-wrapped cylinder base. There are two tables. One is a little shorter and rests under the larger table.


Supplies Needed

Affiliate disclosure: when a purchase is made through the links below, I may earn a small commission from qualifying purchases on Amazon and other retailers.

  • Circular Saw: link.
  • Sander: link.
  • Nail Gun: link. 
  • Wood Filler: link.
  • Wood Stain: link.
  • Wood Glue: link.
  • Pole Wrap (they come in different sizes. Make sure you purchase the right dimensions): link.
  • Veneer Tape (this comes in different thickness. Make sure your dimension matches the thickness of your tabletop): link.
  • Varathane’s Weathered Oak Stain: link.
  • Wooden Circles: link.

Step-by-Step Guide

Making the Smaller Fluted Coffee Table

DIY fluted coffee tables.
Cutting concrete form tube.
DIY fluted coffee tables.
Adding pole wrap.
DIY fluted coffee tables.
Adding veneer tape.

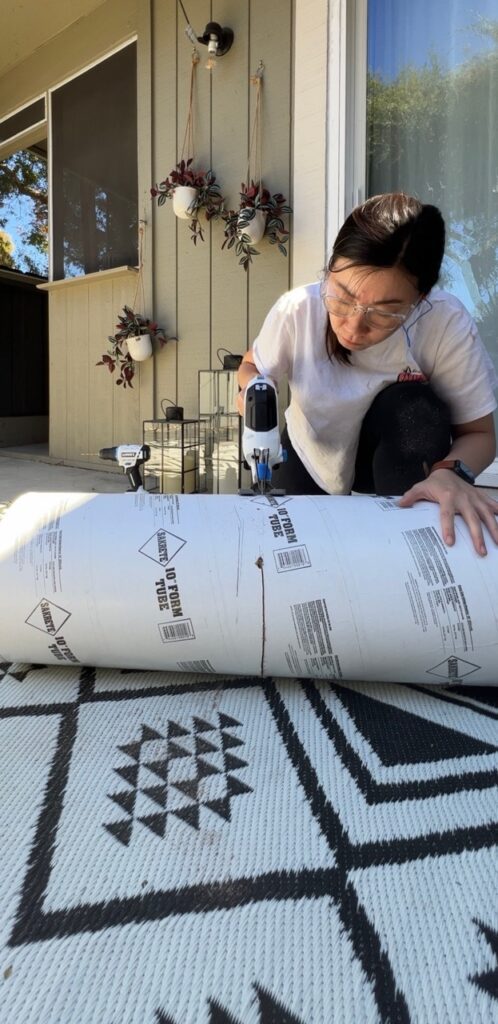
  1. For the base for the smaller table, I used concrete form tube as the main structure. Form tube is a really hard cardboard that’s cylinder in shape and can often be found at the hardware store. 
  2. Cut the form tube to the desired height (mine was 17″ tall) and cut the pole wrap to the same height.
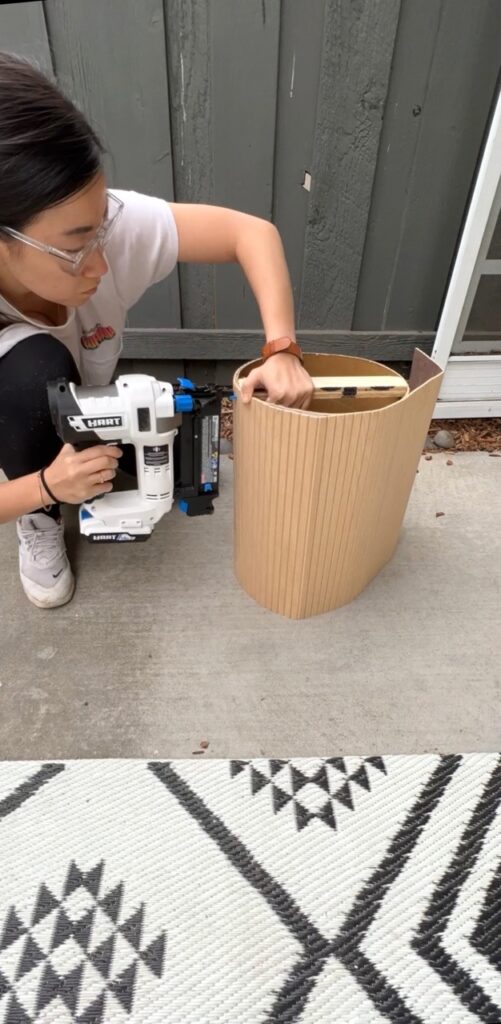
  3. Then use wood glue and nail gun to attach the pole wrap around the form tube.
  4. As the form tube is hollow, take a piece of scrap wood and cut it to fit the inside of the form tube. Once cut, use a nail gun to attach it to the end of the tube. This will serve as the surface which you can attach a table top to.
  5. Use wood glue and stick the table top to the wood piece you attached in step 4.
  6. Sand the surfaces smooth.
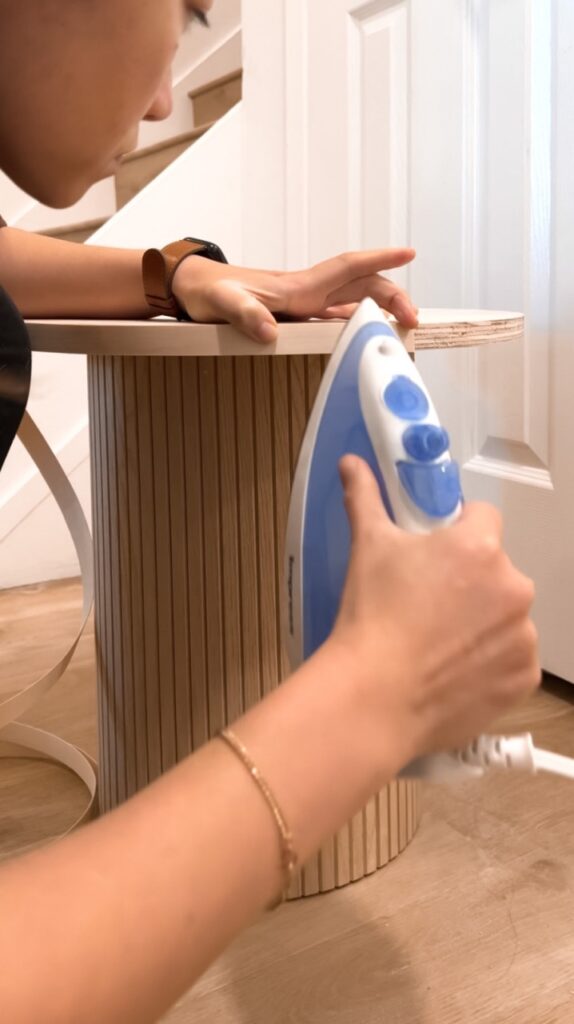
  7. To keep things simple, for the table top, you can purchase already-cut circular wood at your local hardware store, or online. If your table top is made from plywood, use veneer tape and a hot iron to stick veneer tape to the sides of the table top to give it a more completed look. If you’re using solid wood table tops, you can skip this step.
  8. Lastly, stain the table top with Varathane’s Weathered Oak stain.

Making the larger Fluted Coffee Table

DIY fluted coffee tables.
Assembling the inside structure of the table.
DIY fluted coffee tables.
Adding pole wrap.

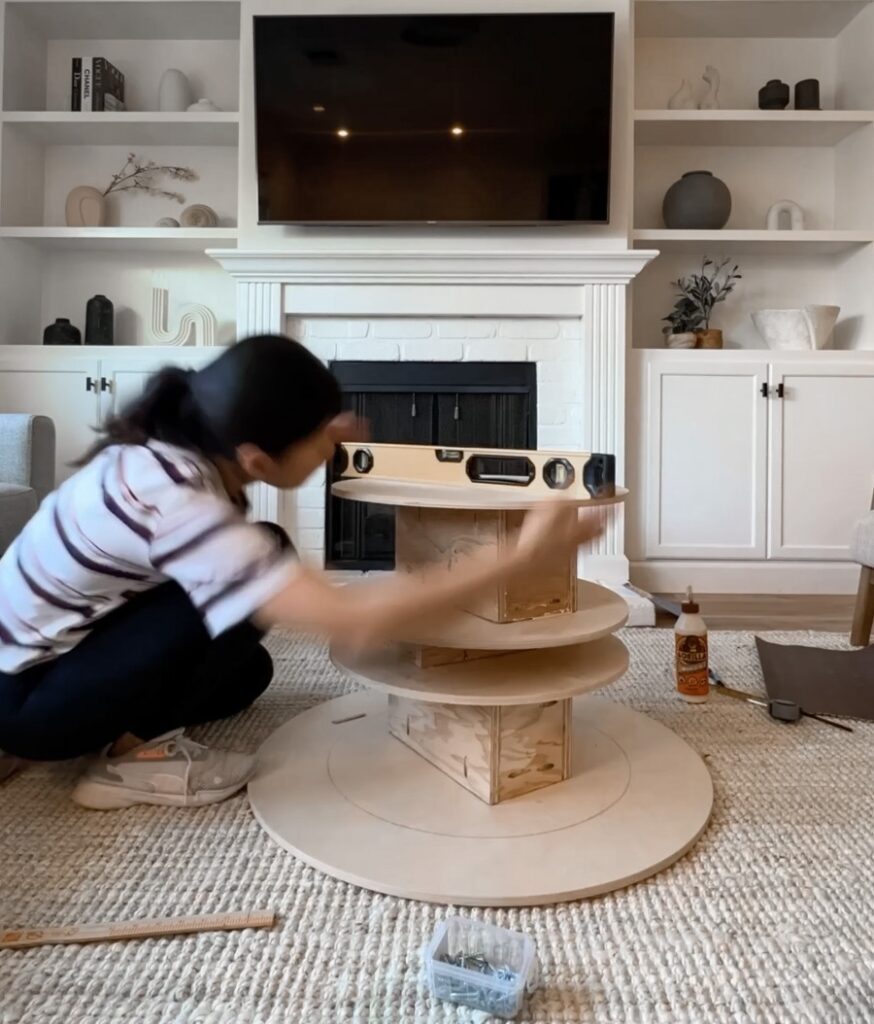
  1. There was no form tube with a size suitable for the larger table, so I bought 3 circular wood pieces and made a cylinder structure instead,
  2. To make the cylinder structure, cut down plywood and make three rectangular shapes. This adds height and sits between the wood pieces. The total height of the cylinder structure was 19″.
  3. To assemble the cylinder structure, use a leveler and make sure each of the wood pieces are perfectly aligned on top of each other and is being assembled straight.
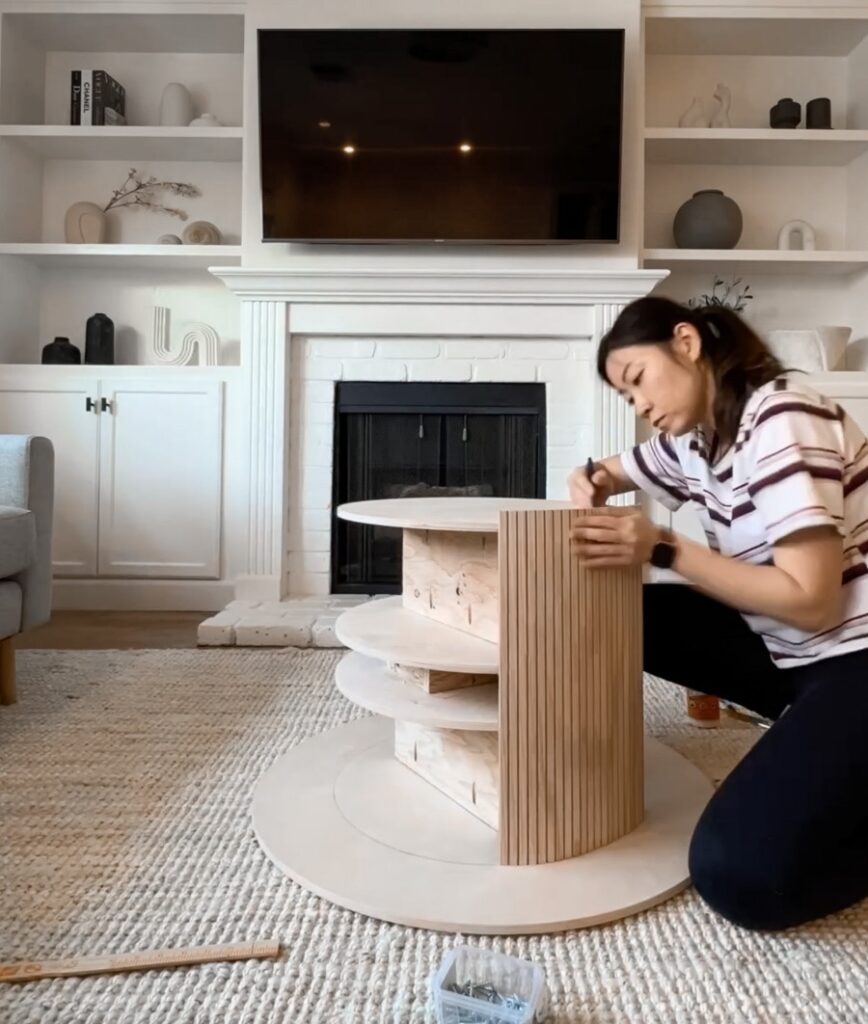
  4. Once completed, measure and cut pole wrap to the dimension of your cylinder structure. To attach the pole wrap, use wood glue and nail gun, and nail the pole wrap around the cylinder structure.
  5. Filled the nail holes with wood filler.
  6. Use wood glue and stick the table top to the top of your cylinder structure.
  7. Sand the ends and the table top to make it smooth. 
  8. Use veneer tape and a hot iron and wrap the edges of the table top if needed.
  9. Lastly, stain the table with Varathane’s Weathered Oak stain.

This is the finished table. I love it!

DIY fluted coffee tables.

Completed, DIY fluted coffee tables.

Video Tutorial

If you have any questions, leave a comment below or DM me on Instagram / YouTube and I will help answer as best as I can!

Category: Furniture DIY Tags: Fluted Furniture

Next Post →
How to Build a Built-in Bookshelf

You may also like

IKEA Rast Dresser Hack Before and After
IKEA Hack – Complete Rast Dresser Makeover
Black Fluted IKEA Malm Dresser Hack.
IKEA Hack – How to add Fluting to Malm Dresser
Completed DIY Built-in Bookshelves
How to Build a Built-in Bookshelf

Reader Interactions

Leave a Reply Cancel reply

You must be logged in to post a comment.

Primary Sidebar

Jenn Liu profile picture

Hey, I’m Jenn!

I learnt how to DIY with power tools within a few months, and I believe you can too.

I’m so happy you’re here! Feel free to email me if you have any questions, or reach out on Instagram.

  • Email
  • Instagram
  • Pinterest
  • TikTok
  • YouTube
  • IKEA Hack – Complete Rast Dresser Makeover
  • IKEA Hack – How to add Rattan to Malm Dresser
  • IKEA Hack – How to add Fluting to Malm Dresser
  • How to Lime-Wash a Bedroom

Categories

  • Bathroom Makeover
  • Furniture DIY
  • IKEA Hack
  • Lime-Wash

jnn.liu.liu

Simple home office makeover with IKEA shelves🥰 - - Simple home office makeover with IKEA shelves🥰
-
-
#homeofficedecor #homeofficeideas #japandihome #wabisabihome #ikeahome #ikeastyle #ikeaideas #ikeadiy #ikealover #ikeahacks
I needed more space to put my home decor 😁Ikea Bil I needed more space to put my home decor 😁Ikea Billy shelves are great! Easy to put together and they look great when styled! ✨ 
-
-
#homedécor #ikeahome #wabisabihome #japandihome #ikeahack #ikeaideas #wabisabiinteriors #wabisabiinteriors #billybookcase
Movie night just got so much better with @xgimitec Movie night just got so much better with @xgimitech MoGo 3 Pro! 🥰✨ Love how compact, portable, aesthetic it is, and how it easily projects & auto focus from any angle using its Intelligent Screen Adaption technology. It also connects directly to our streaming channels! 🥰🥰

@xgimitech is offering Black Friday sales now - 16% off on MoGo3 Pro on Amazon and 53% off selected products on their site! Go check it out. Link in stories! 
-
-
#XGIMI #XGIMITECH #MOGO3PRO #ad #romo #cozyvibes #cozyroom #projectors #movienight🎬 #movienightathome #movienight
Yayy🥳🥳 Loving my DIY recessed shelf!! So much extr Yayy🥳🥳 Loving my DIY recessed shelf!! So much extra storage now!! 🥰💛 

Check out the previous video for DIY process! ✨
-
-
#homediy #bathroomdiy #bathroomrenovation #bathroomstyle #bathroomreno #homerenos #homerenovations #diyproject #diyideas
I finished the recessed shelf!!✨🥰 - - #bathroomdiy I finished the recessed shelf!!✨🥰
-
-
#bathroomdiy #homereno #bathroomideas #bathroomreno #diyprojects #diyproject #homediy #diybathroom #recessedshelf
Luckily…there is a Part 2! 😁😁 - - #diyproject #hom Luckily…there is a Part 2! 😁😁
-
-
#diyproject #homediy #homerenos #bathroomdiy #bathroomreno #bathroomrenovation #diyrenovation #diyremodel #bathroomstyle

Footer

Let’s be friends

  • Email
  • Instagram
  • Pinterest
  • TikTok
  • YouTube

More Info

  • About
  • Privacy Policy

Stay in Touch

Get the latest updates on upcoming projects, best DIY tips & ticks!

Copyright © 2026 · JnnLiuLiu

Lexi Theme by Code + Coconut